Skip to main content
702.948.7595
702.948.7595
702.948.7595
702.948.7595
Home
Doctors
Dr. W. Tracy Hankins
Dr. Samuel M. Sohn
Our Practice
Locations
The MedSPA – Advanced Aesthetics
Specials and Events
Dr. Hankins Online Reviews
Dr. Sohn Online Reviews
Testimonials
Financing
BLIS Insurance
Out of Town Patients
Media & Video Gallery
Surgical Procedures
Face
Facelift / Neck Lift
Mini Facelift
NeoGraft
®
Hair Replacement System
Brow and Forehead Lift
Buccal Fat Removal
Eyelid Lift (Blepharoplasty)
Rhinoplasty (Nose Surgery)
Lip Lift
Ear Pinning and Reshaping (Otoplasty)
Facial Fat Grafting
Breast
Breast Augmentation
Breast Lift with Implants
Breast Implants
Breast Lift
Breast Reduction
Breast Reconstruction
Breast Implant Revision
Breast Implant Removal
Inverted Nipple Treatment
Fat Grafting
Male Breast Reduction (Gynecomastia)
Gender-Affirming Surgery
Body
Liposuction
Tummy Tuck
Mommy Makeover
Brazilian Butt Lift In Las Vegas With BBL Specialists
Arm Lift (Brachioplasty)
Thigh Lift
Post Weight Loss Surgery
Fat Grafting
Vaginal Rejuvenation and Labiaplasty
Calf Augmentation
Male Plastic Surgery
Male Breast Reduction (Gynecomastia Treatment)
Pectoral Augmentation
Penile Enhancement
Calf Augmentation
Post-Bariatric Body Contouring
Blepharoplasty
Tummy Tuck
Liposuction
Facelift / Neck Lift
Rhinoplasty (Nose Surgery)
Ear Pinning and Reshaping (Otoplasty)
Brow and Forehead Lift
Calf Augmentation
Injectables and Dermal Fillers
Skin Resurfacing
Non-Surgical Treatments
Injectables and Dermal Fillers
BOTOX
®
Cosmetic, Xeomin
®
& Dysport
®
Dermal Fillers
KYBELLA
™
Skin Resurfacing
IPL / Laser Skin Treatments
Clear+Brilliant
®
Fraxel DUAL
®
and Fraxel re:pair
®
SST Lasers
Chemical Peels /Microdermabrasion / Dermaplaning
Skin Tightening
Thermage
®
Ultherapy
®
Laser Hair Removal
Non-Surgical Body Contouring
CoolSculpting
®
Liposonix
®
Liposuction Alternative
VelaShape
™
Cellulite Treatment
Skin Care Products
Gallery
Blog
Office Blog
Real Self Blog – Dr. Sohn
Real Self Blog – Dr. Hankins
News Room
Contact
Email Us
myPatientNOW Portal and Forms
Directions
BOTOX
®
Gallery
Home
Gallery
BOTOX
®
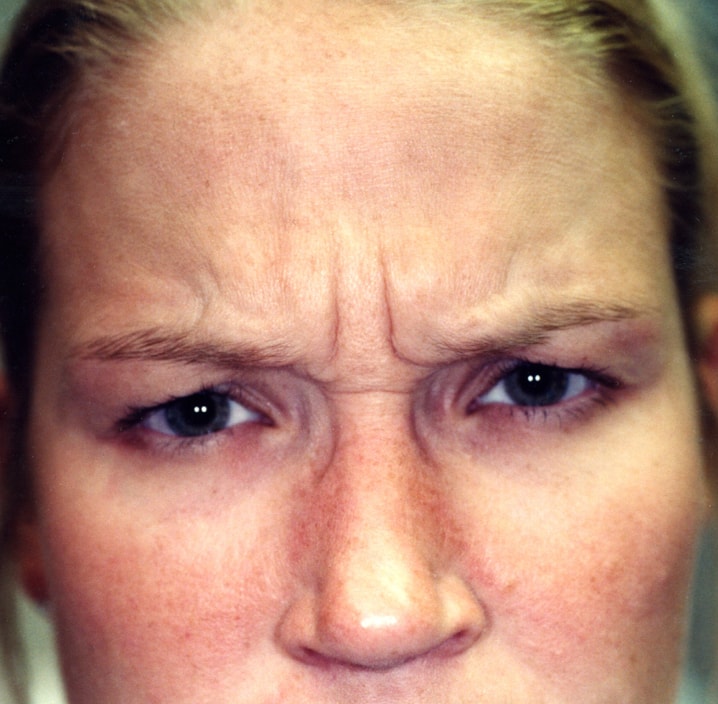
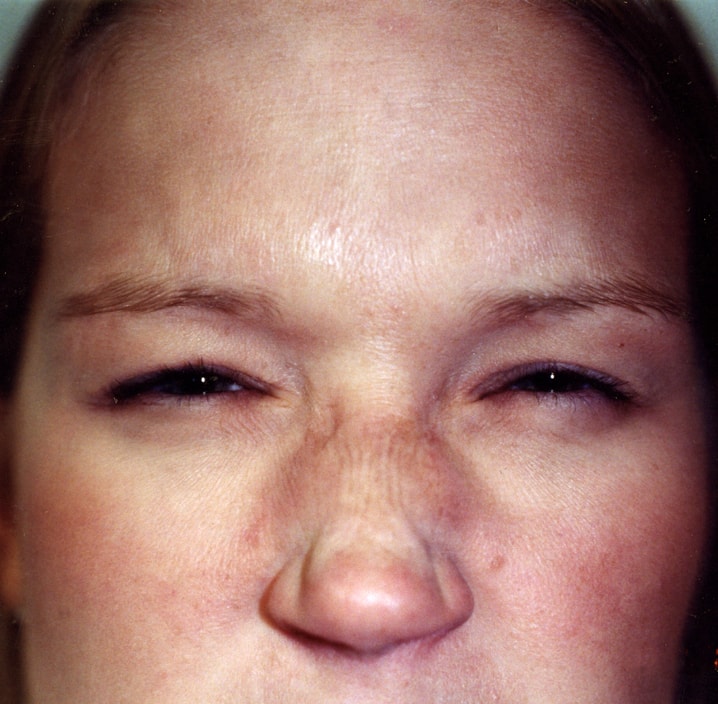
Patient 2
Before
After
Back to Gallery
Patient 2
Details